 |
 |
 |
 |
 |
 |
 |
 |
 |
 |
|
|
|||

 |
To get the very best from your fork it is important to maintain them. It takes very little time to do so, and the rewards will be better suspension action and longer lasting seal life.
To prevent dirt ingression of the fork seal it is important to clean the chrome stanchion regularly. Many people forget to clean the section of fork that is hidden by the fork guard. On a multi-day ride the hardened mud should be cleaned off your fork slider at the end of every day.
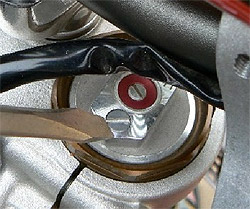
After every ride it is important to bleed the built-up air pressure from the forks. To do this, simply place the motorcycle on a stand so that the front wheel is off the ground and unscrew the air bleed screw on the top of the fork. This screw will be a Phillips or flat blade screw and is normally located off centre. See attached photo.
Another part of fork seal maintenance is to periodically clean your dust seals. This can be done by gently prising your dust seal down with a flat screwdriver, then spraying some silicon spray in the cavity. This will not only flush out any foreign matter but will also lubricate the seals. When reinstalling the dust seal, make sure you push it back on evenly all the way.
Bush Mechanics
Many people have adopted the process of using a feeler gauge or similar to stick up inside the fork seal to dislodge the piece of grit that is causing the fork seal to leak. While this can be useful to stop the leaking fork seal from dribbling oil onto the front brakes, it can also be detrimental to the performance and condition of your fork.
Firstly the loss of fork oil will change the action of the forks. The forks will become soft, will dive excessively under brakes and bottom out too easily. The lack of lubrication can cause fork bushes to wear and the chrome stanchion to mark.
Secondly, it is impossible to guarantee that the piece of grit that is causing the fork seal to leak is removed by the feeler gauge. In some attempts, the piece of grit is forced further up into the fork and will be impregnated into the fork bush. Would you remove your engine oil fill plug and insert a piece of dirt or mud?
So while fixing a leaking fork seal out on the trail is a good short term idea for maintaining safe operation of your front brakes, it is not the best long term for the performance or condition of the fork. The fork should be disassembled and cleaned before the next ride to prevent any long term damage.
How do clickers work?
The clickers on your bike are basically just a tap. Like the taps in a bathroom, your clickers are a means of adjusting the flow. Adjust the clicker clockwise to close the tap and reduce the flow and adjust them anti-clockwise to open the tap and increase the flow. When adjusting the clickers on the bottom of your fork, the direction of clockwise and anti-clockwise is as seen from below, so it may help to lie on your back, on the ground and look up at the clicker to get the direction right.
Adjusting the compression clicker clockwise will reduce the flow to make the suspension action stiffer. Adjusting anti-clockwise to increase the flow will make the action softer.
Adjusting the rebound clicker clockwise will reduce the flow to make the suspension rebound slower. Adjusting anti-clockwise to increase the flow will make the suspension rebound faster.
Tyre Pressures
Your tyres and tubes are the first line of suspension when hitting bumps.
Excessively high tyre pressures can cause your suspension to feel harsh on hits, provide poor traction and cause the front tyre to wash out in turns.
Excessively low tyre pressures can cause the front to not turn in when cornering and provide a general vague feeling as the tyres roll off the rims. Excessively low pressures also put you at risk of pinched tubes and buckled rims.
In general between 10 and 16psi for trail, enduro and motocross riding is acceptable depending on riding terrain, tyre and tube types. Between 18 and 32 is acceptable for adventure bikes, depending on terrain, tyres, tubes, luggage carried and overall speed.
Bike Lowering
Lowering a bike, or which way to lower a bike, is always going to provide differing opinions.Obviously lowering a bike is something that is only considered by a short person, or a person with short legs. An experienced short rider does not need to lower their bike because they have enough riding ability and confidence to ride without putting their feet on the ground. Stefan Merriman is a perfect example of this, but we're not all multi-time world enduro champions.
Short motocross riders rarely need to lower their bikes, even at a club level, because their tracks are relatively smooth and obstacle free in comparison to trail and enduro riding. A motocross rider should not have to stop during a race or put their feet down after leaving the start gate.
Sometimes a junior rider has to ride a particular bike size because of age restrictions. If a junior rider is shorter than average they will be disadvantaged without lowering the bike.
Following are some options for those struggling to get their feet on the ground. Clubman enduro riders and trail riders, especially novice trail riders will benefit greatly from being able to get their feet on the ground. The extra confidence that this will yield will allow the rider to tackle tough terrain, keep up with other riders and continue to improve their riding ability and therefor their confidence will continue to grow.
Option 1. Ride the bike as it is.
It’s easy for an experienced rider to say "Just deal with it, you'll get used to it sooner or later". But a novice rarely has the confidence to tackle challenging terrain and when they do, they don’t have the riding ability to back it up. Quite often this results in the rider getting stuck in an awkward position without being able to get their feet onto the ground. This normally ends with the bike and rider hitting the deck. This failed attempt prevents their confidence from increasing or lowers it even further.
If a short rider is continually dropping their bike, they will exhaust themselves from picking their bike up over and over again. Simple things like U-turns can be near impossible as the bike needs to lean over too far to allow their foot to reach the ground, they then struggle to stop the momentum of a falling bike.
While this option is free, the continued repairs of crashed bikes and bodies soon adds up.
Option 2. Back off the rear spring preload and slide forks up through the triple clamps.
While this is free and it does get the seat closer to the ground, it provides the worst handling bike. Having the rear spring backed off a long way upsets the whole bike geometry, makes the rear shock too soft and causes the bike to pitch back and forward (think see-saw) when braking and accelerating which unsettles the chassis and makes the steering very unpredictable. There are also limitations and safety issues to consider when raising your forks through the triple clamps - see option 5.
Option 3. Cutting foam from the seat.
Depending on the bike, you can or cannot lower the seat height enough this way. Some bikes have plenty of foam to remove but others not so much. This option is great if two people are riding the bike and a second seat is purchased and swapped over for each rider. One downside is that after a long day in the saddle, your backside gets a little sore from hitting the seat base through the thin layer of foam. Let’s face it, some seats are bad enough as it is. Depending on the shape of the re-contoured seat, it can be restrictive to moving around on the bike.
Option 4. Lowering the subframe.
Lowering the subframe will lower the seat height but can cause the seat to be sloping backwards. While this isn't a problem on a 125cc 2 stroke, it can be on a more powerful bike. The sloped back seat can cause a rider to continually slide back on the seat which can create bike control and armpump issues.
The other misconception here is that you still have full suspension travel. While the shock does have full travel, the available travel of the rear wheel is reduced by the lowered airbox/rear guard. There is also a safety issue with this reduced rear tyre to airbox/ rear guard clearance - see option 5.
Option 5. Fitting a lowering link.
Lowering links are not available for all bikes and often only come in one size (about 40mm). This might be too much for some, just right for others, or not enough for someone else. Fitting a lowering link will only lower the rear and if the front isn't addressed, you'll end up with an unbalanced and poor handling bike. So the lowering link manufacturer suggests raising the forks up through the triple clamps. One hurdle you face with this option is you can rarely raise the forks up through the triple clamps 40mm to keep the bike balanced or level. To allow more room to raise the forks, some have fitted bar raisers, but let’s face it, if you're short enough that you're lowering the bike, you don’t need bar raisers!
The biggest concern with lowering links is the safety aspect. Picture this. You've got 300mm of suspension travel at each end and you've got 310mm of clearance between the top of your tyre and the underside of your mudguard. So when you bottom your suspension out, you should still have about 10mm of clearance. Fitting a lowering link to the rear and raising the forks up through the triple clamp does not change your amount of suspension travel but only the clearance between the tyres and guards. So instead of 310mm clearance you've only got 270mm of clearance. Next time you bottom your suspension out, your tyres are trying to travel 30mm into your lower triple clamp and into your rear guard and airbox.
On some bikes, the shock bottom out bumper and the fork bottoming elastomers or cones may not be offering any bottoming resistance before the tyres hit the guards. This means the tyres won’t just gently kiss the guards but instead will be slamming into them. This interference is enough to cause the wheels to lock and in some cases stall the engine. The result can be a trip over the bars and a meeting between body and ground. For this reason, we never fit or recommend lowering links.
Option 6. Lowering the suspension.
This option is a custom modification, so the bike can be lowered any amount you choose. Lowering this way involves dismantling the suspension, machining travel limiting spacers to reduce suspension travel and reassembling with fresh oil and gas.
This is the safest and most correct in terms of maintaining bike geometry and handling. This mod is totally reversible and is easy to return back to standard height. For juniors, the suspension can be lifted back up in stages as the rider grows.
Compromises
Lowering a bike, of course has its compromises. It is a compromise between safety, comfort, confidence and ground clearance. Lowering the bike makes a huge improvement to confidence, especially on hill climbs and in slow technical terrain. It can also make the bike corner like it is on rails (think go-kart). Some compromises are that the frame rails and/or bash plate is lower, so it will take a little more effort to get over those massive logs laying across the trail and the foot pegs will get hooked up in deep ruts a little easier. Most of the time, the improved confidence is enough to have the rider on the gas enough to get over the log or up the hill better and easier in the first place.
Depending on the bike and how much it is lowered, you might have to shorten your sidestand.
A novice may only need to lower their first bike. The increased confidence and the improved riding ability gained on the lowered bike may put them in a position where they don’t need to lower their next bike. Different bike can be lowered different amount so contact us to find out how much we can lower yours.

| Home | Services | Products | Tech Tips | FAQ's | Testimonials | Photo Gallery | Contact | Disclaimer and Privacy Policy © Suspension Matters 2012 |
Website Design by |